
Page 49 - BSAM 2015 Q3
P. 49
materials too. A time-lapse film showing Bjorn wiring a large pine collapses many hours into five minutes. The effect is mesmerizing.
A self-scoring quiz at the end of the Techniques lectures reinforces the lessons before the main lec- ture, Creating Your Own Bonsai Tree, the longest and most comprehensive component. This lesson can be watched over and over again as you work on your own trees.
The Bonsai Beginner’s Course has been well re- ceived, exceeding Oscar’s and Bjorn’s expectations. Students have scored the course 4.9 out of 5 stars. Many are clamoring for intermediate and advanced subjects.
Both instructors attempt to answer all the question posted by students regarding the course.
How are they reacting to this success? Bjorn and Oscar were interviewed by phone and e-mail where they talked about this exciting new learning tool they have brought to the world of bonsai.
BCI: You both started you bonsai journey in your early teens but on different paths. How did you become aware of each other’s work and how did you meet?
(Continued next page)
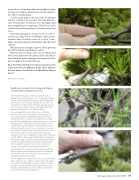
Ramification: excerpts from Pruning and Shaping lecture, The Bonsai Beginner’s Course:
First image; Elongating coniferous species such as junipers are pruned using scissors, cutting branch tips back to semi-hardwood as they elongate during the growing season. Avoid pinching junipers as this can damage the tender foliage. Other elongating species such as spruces, hinoki cypress and cryptomeria are pruned using both scissors and pinching.
Second image; Whorled conifers, two- and three- needles pines such as black pine and red pine, can
be candle pruned and needle plucked in the early summer months to induce a second flush of annual growth. This expedites the ramification process, creates energy balance and reduces needle length. In early summer, first cut the weakest candles off at the base and pluck needles back to ten or twelve pairs around each removed candle. Ten to fourteen days later, cut the strong candles in the same manner and pluck needles back to six or eight pairs around each removed candle. Within a few weeks multiple buds will appear where the original candles were cut. Cutting the weak candles first gives them a head start and by leaving more needles in weaker areas and less needles in strong areas, growth can be properly balanced.
Third image; In the autumn after the new growth has fully elongated and hardened off, remove all but two buds in each area, choosing those most similar in strength and laterally oriented.
Fourth image; Five needle pines such as Japanese white pine, cannot be de-candled as these will not produce a second flush within the same year. Instead, cut the strongest candle in half during the growing season, leaving some needles on each candle to ensure the survival of the branch. (Continued)
July/August/September 2015 | BCI | 47
