
Page 40 - BSAM 2015 Q1
P. 40
SECOND DAY, SAIKEI WORKSHOP:
Witch Mountain Fantasy Arrangement
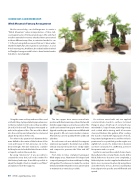
On the second day, our challenge was to create a “Witch Mountain” saikei interpretation of thin, tall, soaring pinnacles of fantasy landscapes. We switched to taller extended root trees that had been pre-trained in three different ways: One, in restricted media for our 1:10 Project using shallow saucers that are 10 times wider that their depth; Two, those grown in cut-down 2-, 3-, and 4-inch nursery pots; And three, those that had been wired to Plexiglas hexagons with holes to have limited media but able to stand upright.
Using the same oval tray and wood disc used on the first day, Jay taped plastic pipe extensions to the two tallest 8-inch rocks so they would be 28 and 26 inches tall. The pipes were taped to nails in the plywood disc. The wood disc fitted into the oval tray and allowed us to rotate and adjust the position of the rocks.
For other rocks, quarter-inch diameter holes were drilled in the center of the bottom of the rock and heavy 3.0 mm wire was cut to the desired length. The wire extensions could be held in place in holes drilled into the wood disc or taped to nails in the wood disc.
By using “extensions” it was possible to created the very thin, tall rocks needed for this fantasy landscape. It would be possible to adjust the height of each rock and to use “fillers” and plants to hide the supports.
The two upper trees were secured into position with fine tie wire in positions that would hide the support pipes as much as possible. The cardboard centers from paper towel rolls were slipped over the pipe extensions and filled with lava gravel to fill-out create sturdier columns. A funnel was used to quickly fill the cardboard cylinders.
As each new rock was added, the support extension was taped to the initial ones and the vertical structure became more solidly stable and compact to preserve the “thin and tall” illusion.
From time to time, crumpled newspaper filled empty areas. Aluminum foil shaped and compactly wrapped sections with tape holding all together. The idea was to make the section below a bit thicker than the section above it; but to maintain it as vertical as possible.
As sections were built out, we applied cornstarch keto-tsuchi to surfaces to blend things in place. A half cup of cornstarch was mixed with 1.5 cups of water, stirred vigorously, and cooked while stirring until it becomes clear and thickens like gelatin. After cooling, the starch is mixed with equal parts of moist, long-strand sphagnum moss and fine volcanic pumice and coco-peat that goes through a one eighth inch screen. If a stickier mix is desired, use more cornstarch. For a stiffer mix, use more fine pumice and coco-peat.
I prefer to use Java Moss which forms sheets that adhere to the cornstarch keto-tsuchi. At the finish, if the moss does not cover completely, a little sticky keto-tsuchi is applied and fine bits of Kyoto moss is pressed in place. By using these and other forms of moss, the moss variety that best adapts to the specific area will flourish and spread.
38 | BCI | April/May/June 2015
