
Page 20 - BSAM 2018 Q4
P. 20
Kintsugi for Outdoor Applications
Photographs by Joe Grande
How do we take the traditional technique of Kintsugi and re-imagine it for today’s bonsai practice using contemporary materials that are affordable, readily available, and result in weatherproof performance for your mended pottery? Here is an alternate method that you can execute with a little practise.
Materials required:
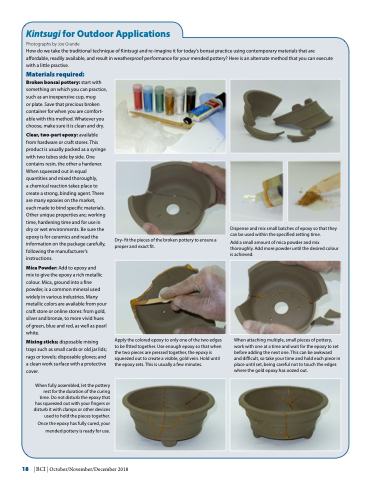
Broken bonsai pottery: start with something on which you can practice, such as an inexpensive cup, mug
or plate. Save that precious broken container for when you are comfort- able with this method. Whatever you choose, make sure it is clean and dry.
Clear, two-part epoxy: available from hardware or craft stores. This product is usually packed as a syringe with two tubes side by side. One contains resin, the other a hardener. When squeezed out in equal quantities and mixed thoroughly,
a chemical reaction takes place to create a strong, binding agent. There are many epoxies on the market, each made to bind specific materials. Other unique properties are; working time, hardening time and for use in dry or wet environments. Be sure the epoxy is for ceramics and read the information on the package carefully, following the manufacturer’s instructions.
Mica Powder: Add to epoxy and
mix to give the epoxy a rich metallic colour. Mica, ground into a fine powder, is a common mineral used widely in various industries. Many metallic colors are available from your craft store or online stores: from gold, silver and bronze, to more vivid hues of green, blue and red, as well as pearl white.
Mixing sticks; disposable mixing trays such as small cards or old jar lids; rags or towels; disposable gloves; and a clean work surface with a protective cover.
When fully assembled, let the pottery rest for the duration of the curing time. Do not disturb the epoxy that has squeezed out with your fingers or disturb it with clamps or other devices used to hold the pieces together.
Once the epoxy has fully cured, your mended pottery is ready for use.
Dry- fit the pieces of the broken pottery to ensure a proper and exact fit.
Dispense and mix small batches of epoxy so that they can be used within the specified setting time.
Add a small amount of mica powder and mix thoroughly. Add more powder until the desired colour is achieved.
18 | BCI | October/November/December 2018
Apply the colored epoxy to only one of the two edges to be fitted together. Use enough epoxy so that when the two pieces are pressed together, the epoxy is squeezed out to create a visible, gold vein. Hold until the epoxy sets. This is usually a few minutes.
When attaching multiple, small pieces of pottery, work with one at a time and wait for the epoxy to set before adding the next one. This can be awkward and difficult, so take your time and hold each piece in place until set, being careful not to touch the edges where the gold epoxy has oozed out.
