
Page 41 - BSAM 2018 Q4
P. 41
567
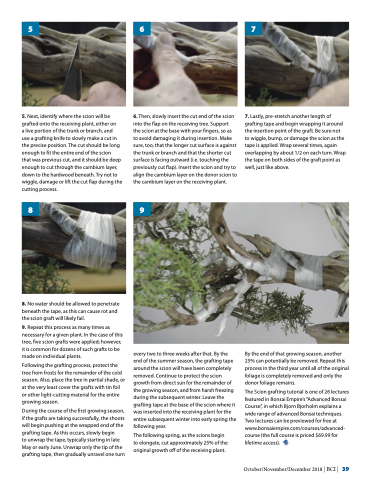
5. Next, identify where the scion will be grafted onto the receiving plant, either on
a live portion of the trunk or branch, and
use a grafting knife to slowly make a cut in the precise position. The cut should be long enough to fit the entire end of the scion
that was previous cut, and it should be deep enough to cut through the cambium layer, down to the hardwood beneath. Try not to wiggle, damage or lift the cut flap during the cutting process.
6. Then, slowly insert the cut end of the scion into the flap on the receiving tree. Support the scion at the base with your fingers, so as to avoid damaging it during insertion. Make sure, too, that the longer cut surface is against the trunk or branch and that the shorter cut surface is facing outward (i.e. touching the previously cut flap). Insert the scion and try to align the cambium layer on the donor scion to the cambium layer on the receiving plant.
7. Lastly, pre-stretch another length of grafting tape and begin wrapping it around the insertion point of the graft. Be sure not to wiggle, bump, or damage the scion as the tape is applied. Wrap several times, again overlapping by about 1/2 on each turn. Wrap the tape on both sides of the graft point as well, just like above.
89
8. No water should be allowed to penetrate beneath the tape, as this can cause rot and the scion graft will likely fail.
9. Repeat this process as many times as necessary for a given plant. In the case of this tree, five scion grafts were applied; however, it is common for dozens of such grafts to be made on individual plants.
Following the grafting process, protect the tree from frosts for the remainder of the cold season. Also, place the tree in partial shade, or at the very least cover the grafts with tin foil or other light-cutting material for the entire growing season.
During the course of the first growing season, if the grafts are taking successfully, the shoots will begin pushing at the wrapped end of the grafting tape. As this occurs, slowly begin
to unwrap the tape, typically starting in late May or early June. Unwrap only the tip of the grafting tape, then gradually unravel one turn
every two to three weeks after that. By the end of the summer season, the grafting tape around the scion will have been completely removed. Continue to protect the scion growth from direct sun for the remainder of the growing season, and from harsh freezing during the subsequent winter. Leave the grafting tape at the base of the scion where it was inserted into the receiving plant for the entire subsequent winter into early spring the following year.
The following spring, as the scions begin to elongate, cut approximately 25% of the original growth off of the receiving plant.
By the end of that growing season, another 25% can potentially be removed. Repeat this process in the third year until all of the original foliage is completely removed and only the donor foliage remains.
The Scion grafting tutorial is one of 26 lectures featured in Bonsai Empire’s “Advanced Bonsai Course”, in which Bjorn Bjorholm explains a wide range of advanced Bonsai techniques. Two lectures can be previewed for free at www.bonsaiempire.com/courses/advanced- course (the full course is priced $69.99 for lifetime access).
October/November/December 2018 | BCI | 39
