
Page 40 - BSAM 2018 Q4
P. 40
This particular article will cover only scion grafting, which is limited to the first purpose of replacing undesirable foliage.
Scion Grafting
Scion grafting involves removing a small shoot or branch from a donor plant and inserting it into the receiving plant. This technique requires patience, precision, and long-term dedication, as it often requires five to ten years to fully develop a bonsai using this technique. The main benefit of scion grafting, however, is that if it is done properly, the graft sites will eventually become nearly invisible, giving the bonsai a more natural appearance as it develops.
When scion grafting, make sure that both the donor plant and the receiving plant are in good health, or as good as possible. Fertilize both plants well during the growing season prior to grafting, which will
take place in late winter or early spring. Also, keep both the donor and receiving plant under slight cover during the winter months before grafting. The trees should be allowed to go dormant, but avoid harsh frosts during that period. In Japan, the most commonly used scion donor foliage is the cultivated Itoigawa Shimpaku Juniper. This growth is vigorous, yet delicate, and it develops nicely and is easy to maintain. If possible, source Itoigawa Shimpaku Juniper foliage (Juniperus chinensis var. Itoigawa) for use in grafting.
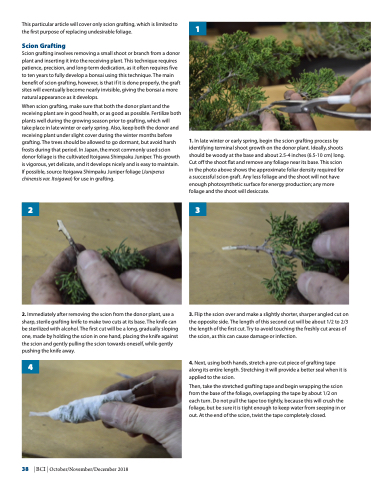
1
1. In late winter or early spring, begin the scion grafting process by identifying terminal shoot growth on the donor plant. Ideally, shoots should be woody at the base and about 2.5-4 inches (6.5-10 cm) long. Cut off the shoot flat and remove any foliage near its base. This scion in the photo above shows the approximate foliar density required for a successful scion graft. Any less foliage and the shoot will not have enough photosynthetic surface for energy production; any more foliage and the shoot will desiccate.
23
2. Immediately after removing the scion from the donor plant, use a sharp, sterile grafting knife to make two cuts at its base. The knife can be sterilized with alcohol. The first cut will be a long, gradually sloping one, made by holding the scion in one hand, placing the knife against the scion and gently pulling the scion towards oneself, while gently pushing the knife away.
4
3. Flip the scion over and make a slightly shorter, sharper angled cut on the opposite side. The length of this second cut will be about 1/2 to 2/3 the length of the first cut. Try to avoid touching the freshly cut areas of the scion, as this can cause damage or infection.
4. Next, using both hands, stretch a pre-cut piece of grafting tape along its entire length. Stretching it will provide a better seal when it is applied to the scion.
Then, take the stretched grafting tape and begin wrapping the scion from the base of the foliage, overlapping the tape by about 1/2 on each turn. Do not pull the tape too tightly, because this will crush the foliage, but be sure it is tight enough to keep water from seeping in or out. At the end of the scion, twist the tape completely closed.
38 | BCI | October/November/December 2018
